

Tinder has established itself as the king of dating apps. Although it has something of a reputation as a place for hookups (and there’s certainly plenty of truth in that stereotype), Tinder has also become a place where people make new friends and find new life partners. So regardless of your intentions in using a dating app, there’s someone on Tinder who’s looking for the same thing. Tinder is the app to have on your phone if you’re at all interested in modern dating and has itself become a part of popular culture; Netflix’s Master of None has created entire episodes surrounding the service, as have Family Guy and others. It’s become an app even your parents know about, and if you’ve been single during the past five years, there’s a good chance you’ve even used the app yourself. Tinder is a must-have in the dating scene right now, and despite its inherent flaws and mixed reputation among women for some of the creepier men using the platform, plenty of long-lasting relationships have been born out of the service.
There’s really only one thing that you have to have to get started on Tinder, and that one thing: a Facebook profile. You have to connect your Facebook account when you sign up for Tinder. The app pulls photos, account, and profile information directly from your Facebook feed. For most people, this is seen as a convenience factor: you don’t have to directly re-enter your information into the app, your account is made directly for you instead of relying on entering your email and a new password, and your photos are automatically chosen as well. It also has the added benefit of making sure that people who use the service line up with what others are expecting. It helps shield Tinder users against abuse, since many users won’t go through the hassle of creating a fake Facebook account to harass women or other users.
But sometimes you don’t want to link your Tinder to your public Facebook account. Maybe you’re embarrassed at the idea of having a Tinder account, or you’re trying to keep your Tinder private from other Facebook friends. Maybe you’re worried about the privacy implications that come with linking your Facebook account with Tinder. Some users with social-sensitive professions, like teaching, might want to avoid having a Tinder linked with a Facebook. Or maybe you’re so concerned about those privacy matters that you don’t even have a Facebook, or you left the service years ago, but you still want to partake in all the fun of having a Tinder account. Regardless of the spawn point of your concerns, there are plenty of reasons to want to use Tinder without a Facebook account.
Let’s start by breaking the bad news: yes, you absolutely do have to have a Facebook profile to use Tinder. However, that doesn’t mean that (cough, cough) you have to use your REAL Facebook profile. There is a workaround method for those of us who would like to be on Tinder but who don’t want to link our main Facebook account, and that method is this: create a “burner” Facebook account which has just the bare minimum of information so that Tinder will allow you to register.
(One other approach is to use other dating sites that are like Tinder but that don’t require a Facebook link. We wrote another article about that approach – check it out!
Índice de contenidos
Creating a “Burner” Facebook Account
This might sound a bit sketchy, but if you’re dead set on using Tinder without giving the app access to either your already-existing Facebook account, creating a “burner” Facebook account is the best strategy for most people. This will allow you to use your secondary Facebook account to access your Tinder account on a regular basis, while allowing for greater control over your privacy and app access than Facebook and Tinder typically allow for. We should note that running two Facebook accounts for the same person technically violates Facebook’s terms of service, so you may experience difficulties in using the service over long periods of time and may even see your burner Facebook account locked down or outright banned. Still, for our purposes, this is the only way to do it, and we like to think of this as being no different than the “burner” phone numbers often used by those looking to keep their privacy. Let’s take a look at how to use your burner Facebook with privacy in mind.
Using a Temporary Email Address
The first thing we’ll need is a false email address. Typically, popular email services like Gmail and Outlook allow you to sign up for a new email within a few minutes, but those services often require two-factor verification, making you link a pre-existing cell phone number or email address to your new account, and we don’t want that here. Since we’re trying to maximize our privacy, we recommend using a temporary email address through a service like Temp-Mail. These disposable email accounts are easy to use, and don’t require any kind of sign-up or registration. Your false email address is posted at the top of the web page, you can refresh and copy email addresses as needed, and you can click registration links right from your web browser.
With your new email in hand, head over to Facebook and make sure you’ve logged out of your existing Facebook account (or, better yet, use an incognito or private browsing window). When you enter your name, you should use some variation of your real name. For example, if your full name is Jane Maria Smith, use your middle name in place of your last (Jane Maria instead of Jane Smith). This will help you avoid the automatic filters that Facebook deploys to detect duplicate accounts, and raises your privacy protection that much higher. Enter your name, temporary email address, and new password (try not to use a pre-existing password, as a general rule of thumb) into the fields on Facebook’s main page. If there’s one thing we do recommend, it’s using your real birthday here. That comes into play within Tinder, and if you still feel really cautious on using your actual birthday on your burner account, only move the day up or down a few notches. Try to keep the month and year the same.
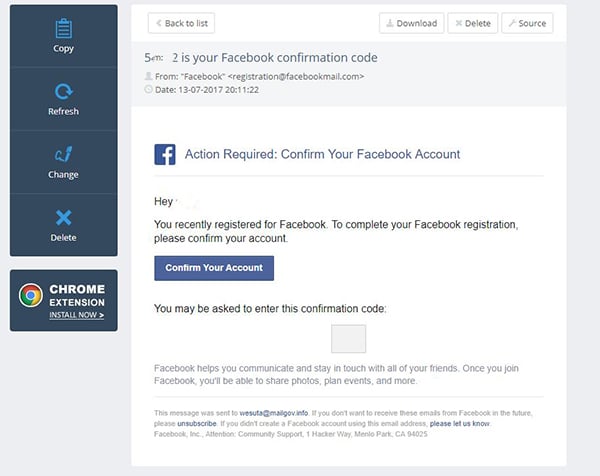
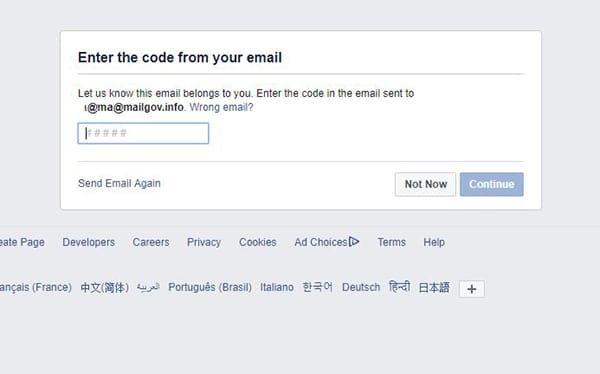
Once you create your account, Facebook will send a code into your temporary email inbox. If you don’t get the code initially, don’t be afraid to hit the “Send Again” button on Facebook’s site. Once you’ve entered the code and confirmed your account, you’ll have a far easier time getting into Facebook. The next page will ask you to add people you might know on the service— though we didn’t seem to actually recognize any of the people on our burner account recommendations. You can hit the next icon to skip this, since we’re not intending to actually populate this account with any friends. The page after this will be your new homepage, where Facebook will again be asking you to add friends through your email, your phone number, or through recommendations. We don’t need any of that.
Now, since you’ll be drawing photos from your Facebook account, you should upload a few photos of yourself to your burner Facebook. This might seem counter-intuitive in the face of privacy, but you’ll need those photos to use Tinder effectively, so grab some images and we’ll make sure your account is ready to go with the correct privacy implications.
Security Provisions
On your burner Facebook account, hit the small upside-down triangle in the top-right corner of your display and hit the Settings option. This will load your account settings, and there’s a ton of stuff we’re going to want to change here to lock everything down tight. On the left tab, hit the “Privacy” tab. Here’s where you’ll find all of your privacy settings, and almost everything here will need some updates:
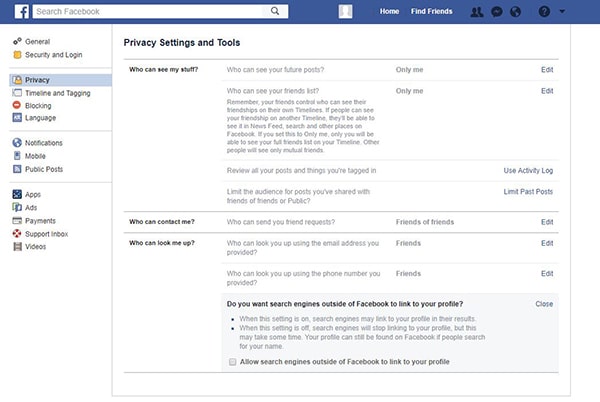
- Future posts: “Only me”
- Friends list: “Only me”
- Friend requests: “Friends of friends”
- Look up by email: “Friends”
- Look up by phone number: “Friends”
- Uncheck “Allow search engines outside of Facebook to link to your profile”
Once you’re done with those privacy settings, click “Timeline and Tagging” on the left side of your settings menu. These are just as important for your privacy as your actual privacy settings, so definitely don’t skip these. Here’s what to change:
- Post on Timeline: “Only Me”
- Who can see tagged posts on your timeline: “Only Me”
- Who can see what others post on your timeline: “Only Me”
- Add to audience: “Only Me”
- Tag suggestions: “No One”
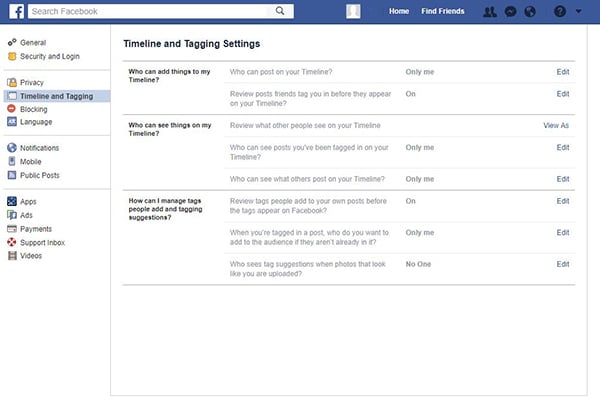
While not perfect, these should more or less entirely block others from seeing your photos outside of a profile photo. Your mileage may vary depending on when you access this guide, though—Facebook has long had a habit of changing how their privacy provisions work on their network.
Creating a Tinder Account
There isn’t actually a whole lot to this step. Once you’ve completed the above—making a false Facebook that runs close to your actual identity without giving up any privacy, all the while tweaking your account settings to be accurate and protective. Since you’ll be making your Tinder account from your phone, you’ll want to make sure you’re signed into Facebook on your mobile phone (or disable the app on your phone in order to prompt a web browser login). Some phones, including Samsung’s newer flagships, have the ability to run two instances of the same app, so if you’re interested in running your account that way, you may want to look into something like that.

You won’t have to do anything special to create your Tinder account, however. Follow the typical installation and login guides, and you’ll be able to use Tinder with as little of your private information on the web as possible. We recommend letting matched users know you aren’t a typical Facebook user though—honesty is the best policy in relationships, after all, and you don’t want to give your prospective mates a bad first impression with a fake Facebook account.
Disable Facebook from Accessing Tinder
Let’s say you already have a Facebook profile and you don’t feel like going through the trouble of creating a new one just for Tinder. No worries—since Tinder simply uses the same Facebook application API as every other app that uses Facebook, we can use Facebook’s own application blocking tools to stop Facebook from seeing or using information from your Tinder account. This means the Tinder app won’t display or post things to your Facebook profile, so your private Tinder account and info will only be available or visible to you—not your whole network of friends and family members.
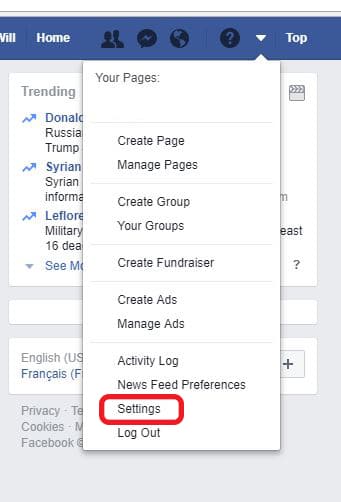
Start by logging into your Facebook account and loading the home page. At the top of your menu bar, you’ll see the same upside-down triangle we mentioned above for accessing your settings menu. Tap the triangle and hit the settings option to access your account preferences.
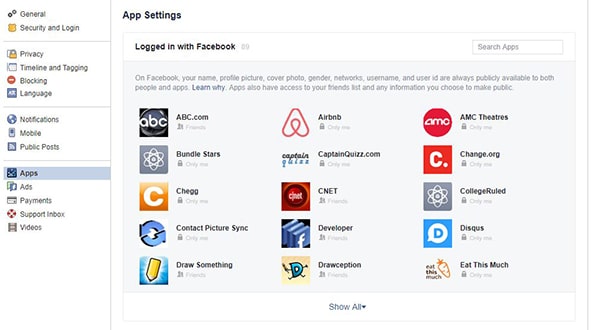
Once you’re inside your settings menu, we’ll want to head over to our Apps preferences. This will allow us to view every single application that has access to your account in some manner. If you’ve ever used that Facebook login shortcut, you’ll find that application here. Tap on Apps and wait for the app list to load. If you haven’t signed into Tinder using your Facebook profile, the app won’t be here. You’ll have to allow Tinder access to your account before you can, ironically, revoke it.
If you’ve been on Facebook for a long time, chances are, you’ll probably have a ton of apps here. This is a good chance to take note about what has access to your Facebook versus what actually needs it, but for now, either hit the “See All” button to view your full application list or, for a quicker method, use the search box in the right-hand corner of the display to search for Tinder. Once you’ve typed Tinder into the box, select it from the drop-down menu to view your account settings information. You can change a bunch of this stuff right from this menu, so here’s what we recommend:
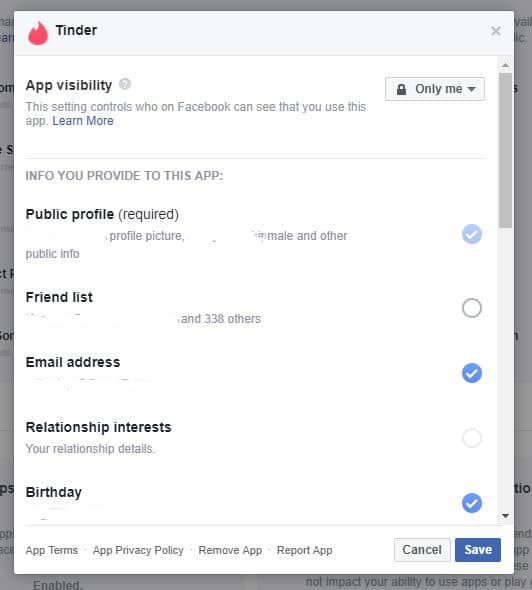
- Ensure “App Visibility” is set to “Only me.”
- Revoke access to your friends list to prevent your friends seeing you have a Tinder.
- Revoke access to your status updates, education history, and likes.
You might run into issues on Tinder if you try to revoke access to the following information:
- Email address. Tinder needs this to track your login information.
- Birthday. Tinder uses this to match users within a specific age range.
- Current city. Tinder uses geolocation to track users near you, but also displays your current city based on your Facebook profile.
- Photos. Tinder uses your photos to build your profile.
Still, what you can revoke is a good amount of information from Facebook, helping to keep your Tinder and Facebook profiles that much more separate from each other.
***
It’s impossible to use Tinder without having a Facebook account. That doesn’t mean you should have to give into the whims of Facebook and Tinder, though. Through either the usage of a “burner” or secondary Facebook account and the control of what your Facebook and Tinder accounts can share between each other, it’s easy to balance your privacy with your want to have a Tinder account. Neither of these methods are perfect though, and unfortunately, if you’re dead set against ever having even a phony Facebook account, you’re going to have to use a different style of dating app.
